A Mount for the Motor

To get this beast of a motor horizontally mounted so that it could drive the scratter we chose to use some of the 18mm ply, figuring that it would have enough strength to take the weight. I measured 3″ up from the bottom of the ply, and then 1 radius of the motor face plus a little bit for the pot and drilled a “just over 3/8 of an inch” hole for the shaft of the motor to pass through.

I then flipped it over, seated the motor on the ply with the shaft in place and marked out the positions of the two mount-holes on the motor face and finally drilled these out with 6.5mm bit.

Once this was done I popped the motor back on the board and secured it firmly in place with two bolts, double washered front and back to save damage to the ply.

Posted in Uncategorized | Leave a comment

The Motor

Here is the beating heart of the scratter, the 1/3HP motor 240v single phase motor that I managed to track down at The Barras. I found it quite difficult to source one at a reasonable price on eBay because the sheer weight of these things means they are either pick-up only or have high shipping costs.

This one is a face mounted motor rather than a foot mounted one. I knew it would mean a bit more work and if I’d had any choice I would’ve bought a foot mounted one. It does one thing well, spins at 1400rpm.

Posted in Uncategorized | Leave a comment

Boxing In…

Not my finest hour this I’d have to say. For a non-woodworker from Manchester, living on the West Coast of Scotland, I’d like to think I’ve managed to engineer some “Somerset Charm” into the machine at this point!

Here’s the back board of the hopper going on and some baton fixed in place on the scratter face:

And this is it boxed in (ha!):

Batons have been applied to the back face. We had to core out 35mm holes from the sides to allow the bar to pass through.

Looks a lot better when peering down into the Pit of Doom:

Posted in Uncategorized | 1 Comment

Mounting the drum

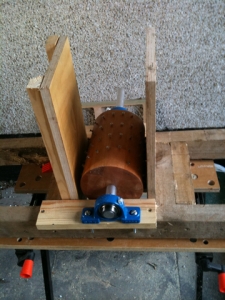
Day two and now the drum is oiled and dry and I’ve managed to get the screws into it following the original pattern:

I’ve got a 25mm aluminium bar that goes through the centre and two pillow bearings with 25mm bore that the bar fits through. The drum was presented to the scratter face and using my professional eye, viewed from above, I aligned the cutting face of the drum with the scratter face.

As you can see there are also a couple of extending wings of wood for mounting the bearings to allow for the fact that 3×2 doesn’t give you enough room to play with when building this out. The bearings were mounted with machine bolts.

Couple of things…

The drum was hand rounded so the cutting face is not constantly square to the scratter face through a 360 rotation. I’m going to adjust the screws to make the clearance between the two constant and hopefully the fact it’s a little off-centre won’t rattle the thing apart at around 900rpm.

The hole in the drum wasn’t a friction fit so Ally came up with the idea of knocking in a hardwood wedge:

…it’s worked a treat. Big thanks to Fireman Davie for making the drum in the first place by the way!

Posted in Uncategorized | Leave a comment

Bits and bobs

Other things I’ve done today:

Applied 2 coats of Danish Oil (available from any decent diy store and some crap ones as well) to the drum and one face of the ply wood (not to give too much away but 3 more plywood sides are going on to the frame tomorrow to form the hopper so I’m oiling the inner faces).

Tested the siting of the drum on its bar and bearings and marked out and drilled holes in the frame for the Pillow Bearings. These will be bolted through the long legs of the frame.

Posted in Uncategorized | Leave a comment

The Scratting Face

This is a bit later on with the scratting face added to the frame.

It’s 200mm wide x “as it comes” high, 18mm ply. At the bottom I’ve added a stainless steel plate (left over from when my kitchen extractor was put in). It’s screwed in place after punching holes through it and into the ply with my old friend the nail punch. I’ve fixed it to the thick cross member using screws coming in from the sides (2 each side).The other cross member isn’t screwed in just yet, it’s just there as a spreader to keep the big legs from flapping about.

Other tools I’m using: Big bar clamp and wee bar clamp (I’ve killed the wee one already though so that’s going back to the shop tomorrow), a Workmate, a just-less-than-semi decent mains power drill, one of those bumper box of drill bits they have in B&Q that you think you need but only ever use about 2 things from (I’m using quite a lot of them here I’m pleased to say), a jig-saw for the ply and I’m checking all my 90-degree angles with a try-square as I go.

Posted in Uncategorized | Leave a comment

The Frame

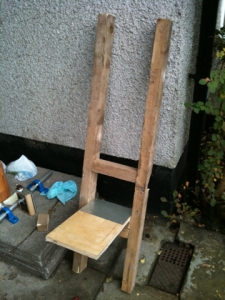
Here’s the start of the frame. I noticed an old 3.5m piece of 3×2 looking lonely at a building site I pass on my way to work each day. Under the cover of darkness and alcohol I set it free. With nails now removed it is on its way to a much better life. It has become 2 x 1250mm lengths and 4 x 205mm lengths.

Here I’ve screwed 2 of the little blocks together and then screwed the long lengths onto them. I’ve used those “rapid-screw” pro type #10 80mm wood screws – they’re a total joy when combined with a half decent drill and a P2 screwdriver bit.

Posted in Uncategorized | Leave a comment

The Drum

This is the business end of the machine.

Ours is made out of beech worktop, several layers glued together and then turned to make a cylinder 200mm w x 150mm dia with a 25mm hole through the middle.

This is 2 sheets of A4 paper stuck together with a printout 471mm (ie π x 150) by 200mm that should match the area of the surface of the drum if it were unfolded.


The dots were done in Photoshop as follows:

Added 10mm per side border so we weren’t screwing into thin air, leaving 180mm of workable width. 5 screws across 180mm leaves a 45mm gap between each one. UK Cider Scratter rules are 5mm spacings across the drum, so that’s 9 steps to reach the next screw. The other rule is 2 cuts per 5mm per rotation so 9 steps should also take us halfway round (235.5mm) or one every ~ 26mm.

I set my paper size to 200mm wide x 471mm long, added a guide every 5mm across the top ruler then I changed the default grid size to 26mm. I selected “snap to grid” and “snap to guide” and then picked a fairly big pencil in the pencil tool and went diagonally downwards from each starting dot plopping one on the intersection of the Vertical guides and horizontal gridlines.

Finally I stuck 2 pieces of A4 together and printed it out on my inkjet.

This what it looks like printed out and stuck around the drum. Gorgeous!

Finally I used a nail punch and a hammer to strike a little hole at each dot, removed the template and marvelled at the fact that schoolboy geometry and sub-basic photoshop had combined to solve a real world problem. What are the chances of that happening, eh?

Posted in Uncategorized | Tagged , | Leave a comment

The Big Build

This Saturday is officially Scratterday. Myself and my pal Ally have collected and stored 110Kg of apples from the local village and intend to make them into cider for fun.

We have no experience of cider-making however we do have plenty of experience talking authoritatively on subjects we know little about and we have Google and power tools. So I can confidently say “it can’t be that hard!”.

First we need apple juice and for that we need to punish the apples. They need ripping apart and then crushing.

I’m going to be building the shredding machine (the scratter) using the design from the UK cider forum and their fantastically steam-punk codling grinder.

Meanwhile Ally is building our press using a design from inside his mind.

This all needs completing before our apples turn to mush. We’ve had them a fortnight now so no pressure there then…

Posted in Uncategorized | Tagged , | Leave a comment